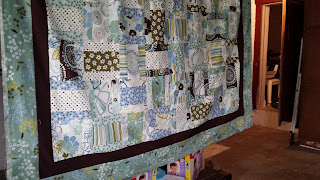
About two years ago, I started on a quilt with blocks pieced from a jelly roll and a layer cake pre-cut (Flashback). Let me just say, pre-cuts are awesome. Blocks really work up quick! I finished piecing the top in August 2014. There are ten rows of eight blocks with a solid brown border and then a wider coordinating border. This helped widen the quilt to be a queen size. And...that's about where things stayed for the next two years. Until this past June.
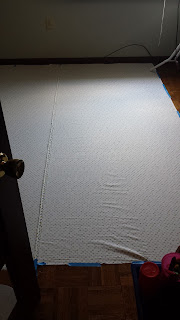
First up was piecing in the backing. For the record, I suck at sewing in a straight line and even more so to iron. I used the technique of ripping the fabric to get a straight line and then sewed the resulting two pieces together. Due to the amount of fabric I had available to me, I had a very slight amount of extra width. Once that was done and pressed as best I could, I had to do a bit of furniture re-arranging in order to lay it all out for basting. I had just enough room for the length of this, though it did mean I was a bit pinched between a floor lamp, easel and the french doors. I used blue painters tape to secure the back to the floor. I found it to work well b/c it sticks to the flooring (in this case, parquet, but works on carpet, too), but doesn't leave a residue. It's also easy to re-position. I would recommend to use the wider roll rather than this narrow one.
The pictures below show this whole thing happening. As you can see, there were wrinkles to start, but I managed to work most of them out.
I pin-basted rather than using thread. It was June and this room is not air conditioned and opening the window would not have provided ventilation, so no chance to experiment with spray-basting. This really took all day to do. My strategy was to pin in quadrants to make it easier to avoid inadvertent puckers. My poor knees and back--really could have used a few more stretch breaks. Next time (because, let's be honest, I have plenty of other projects planned), I'll keep more space between the project and the wall. Nothing like being stuck in a corner.
After doing all the basting, I removed the tape and (carefully) picked this up off the floor. It took me a bit to finally get everything arranged back to normal. The added bonus, though, was, nicely dusted floors and end table. I also purged some old periodicals and such.
It took me a little bit to be ready to tackle the next part--quilting! Long back (and I'm sure I'm repeating myself), I enrolled in Anne Petersen's Craftsy class, Quilting Big Projects on a Small Machine. It proved helpful, once again. I used smoke invisible thread for my top thread and Aurifil white for the bottom as I did the stabilizing stitches for all rows and columns. This wasn't too bad, but then I was stuck (again). I really had no idea how I was actually going to quilt this thing.
I eventually decided I would do a really large scale meander through the top blocks. I used the same bobbin thread for the bottom and clear invisible thread for the top. I threw in an occasional in-and-out spiral just because. The brown solid border was filled with a continuous spiral chain with smoke as my top thread. I really wasn't sure if I wanted to use invisible thread to do the quilting, but it turned out well and I have soooo much of it. Seriously, I have no idea why bought so much of it. By the time I hit the outside border, I was so eager to have this done that it was just a random line around the bunches of flowers--nothing fancy.
The last bit of work was to attach the binding. I had lengths of fabric of the large and small scale mosaics. Sadly, my memory is bad--doesn't everyone remember the intent of orders from two years prior??? I could not remember which was for the binding and which for pillows. In order to decide, I put off the binding and made two pillowcases instead.
For the pillows, I searched for ideas. I was sort of looking for an easy sham and when I asked my husband for his opinion, he indicated he's more for a case, so...that's what I did. I found this pattern for French seam pillowcases and it was soooo easy. I had enough of the solid brown leftover for the accent strip. I decided the large scale would be better for the main body of the case and the smaller scale for the outer edge. As you can see, no pesky threads or unsightly seems. These really are so incredibly easy. My girls decided they need pillowcases, too. (I'm catching on to their little game. They ask for something, I spend the time to make it and then....not interested.)
As a result of my pillowcase decision, the quilt binding became that of the smaller scale print. I estimated what I thought were the quilt dimensions. I really should not do that since it resulted in me cutting and piecing together two extra strips. I attached them on the diagonal and it's such a pain. Before attaching the binding to the quilt, I squared up the edges and cut off the extra binding and back. I have enough of the mosaic fabric for more pillows, so maybe I'll do the strip with the polka-dots to match the back of the quilt--goodness knows some of the scrap strips are wide enough. But I digress. The strips were machine attached to the front of the quilt. I prefer to hand-sew the other side of the binding so it's invisible and I get the bonus of sitting under a warm quilt while watching TV. The first night, of doing this, I almost felt defected. The photo below shows where I was after the first couple hours of hand-sewing. I pretty much only made it across two blocks and the border. It was pretty discouraging and I wondered if maybe it wouldn't have been better to just sew it all on.
It did get better and I did finally get around the whole thing. My corners turned out pretty well. OK, there is the one corner that I think I had more than 1/4" allowance and it screwed it up a little, but who is going to actually look at the corners.
I forgot to mention, with the exception of the solid border, this was made with "Sun-Kissed Spa" by Michele D'Amore for Benartex. The blocks were from one layer cake and one jelly roll of the same collection. The yardage for the border, back and pillows are also from the same collection.
Here it is, though. The finished quilt and matching pillowcases. It only took just over two years, but it's DONE. Whew!


